Year-End Procedures for DOS
Well it's that time of year again. I can't really figure it out, but 2024 went by in a big time hurry. We thought that again this year it would be nice if we could provide you with information regarding that year-end tradition of finishing up your payroll and getting it together for the new year. For the next several pages, we will show you how to wrap-up your payroll for this year, and begin the process for the New Year. If you will follow all these instructions step-by-step, you should have no problem with this once-a-year procedure, and hopefully it will take a lot of the pain out as well.
NOTE: For 2024 we are only supporting the 2 per page Laser Form LW2A.
Make a Backup
The very first thing to do before we begin any updating or processing of information is to make a complete backup of the payroll data files. If you do not have a specific procedure for just backing up payroll, then make a complete data backup of all accounting information. We cannot over-stress how important this first step is. If anything should go wrong in this rather lengthy procedure, you need to be able to put "Humpty-Dumpty" back together again.
Suspend Payroll
Now that you have made a backup of your payroll information, the next step is to suspend the payroll. This process accomplishes several things. The most important thing is that it holds in suspense all of the 2024 information, while starting the new 2025 payroll year. This provides you with the opportunity to take the entire month of January, which you are entitled to under IRS code, in order to properly prepare and present the W-2's to your employees, and process your other year and quarter-ending reports. To begin, you need to be at the Payroll Menu and then select option '03' Utilities. Payroll will now take you to the Payroll Utilities Menu.
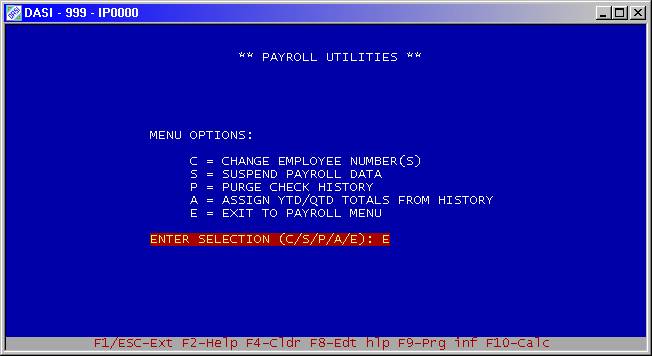
Figure 1
In Figure I above you see Option 'S' to Suspend Payroll. Note that if you DO NOT see Option 'S', you will instead see an Option 'R' to Remove Suspended Data. If you see this option instead, you must select this option FIRST to remove the previously suspended quarter or year-end data. DASI can only keep one set of suspended data at a time. Once the 'S' option is available, select that option. You will then be asked if you want to suspend the Quarter or the Year? Select option 'Y' for Year.
After selecting the option you will see a WARNING screen that will explain in great detail exactly what the suspend option is about to do. Rather than going over it again here, take a few minutes and read the screen. When you are done, proceed to the next paragraph.
Now that you have read the statement and hopefully told the system to continue, the program will now check system capacity to make sure there is ample space on your hard disk drive to store the additional files that will be created when you proceed. If there is not enough room, you will need to free up enough space to retain the extra files that will be created during the procedure.
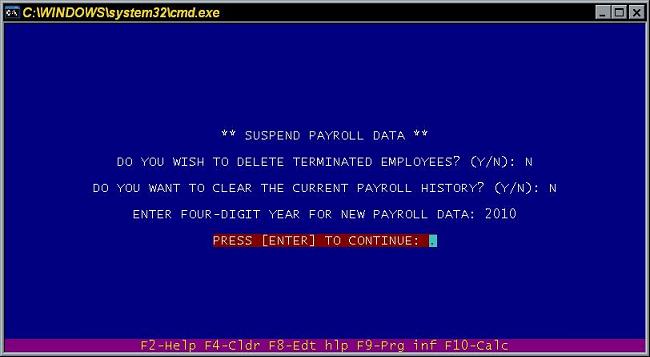
Figure 2
If you have enough space, press the ENTER key to begin suspending the 2024 payroll information. In Figure 2, the program now ask a series of questions related to additional steps the suspend option can take if so desired. Let's review each of them.
Delete Terminated Employees?
If you answer this question with a 'Y' for YES, then payroll will DELETE ALL employees in the CURRENT YEAR ONLY that meet the following criteria.
First, they MUST have a termination date in the Employee Master File.
Second, you must have STOPPED payment under option '22' Payroll Data Input. If both are true, then the suspend option will DELETE ALL employees that meet this criteria for the New Year, 2025. The employees will remain in the suspended data for purposes of reporting and W-2's.
Clear Payroll History?
This option simply wants to know if you want to delete Payroll history information. DASI recommends that you DO NOT delete it since it contains valuable information you can review at any time. The reason this is an option is because the history does take up disk space, and when this option was first introduced, disk space was still at a premium. Today, hard disk space is inexpensive and plentiful, so we recommend keeping your Payroll History indefinitely.
WARNING: IF YOU ELECTED TO DELETE TERMINATED EMPLOYEES IN THE OPTION ABOVE, THE SYSTEM CANNOT MAINTAIN EMPLOYEE HISTORY INFORMATION SINCE THE DETAIL EMPLOYEE RECORD IS NO LONGER ON THE SYSTEM. IF YOU WISH TO MAINTAIN DETAIL HISTORY ON "ALL" EMPLOYEES, THEN ANSWER "NO" TO DELETE TERMINATED EMPLOYEES. KEEP IN MIND THAT SINCE YOU NORMALLY SUSPEND PAYROLL AT THE END OF THE YEAR, ALL DETAIL INFORMATION, INCLUDING HISTORY IS RETAINED IN THE SUSPENDED YEAR.
Four-Digit Year - 2025
The system will default to the new year of 2025. If it does not, then please enter the four-digit number of, '2025'. Now press enter to finish the process of suspending the payroll.
New Options Appear
Notice that you now have two new options. Remove Suspended Data and Toggle to Suspended Data. Also note that the current status at the top of the screen states that you are using Current Data. That is, you are now setup for the new year of 2025. If you wish to review and do anything in the 2024, then you will need to TOGGLE to the suspended payroll year. By simply pressing the letter 'T', the system will change the status from 'CURRENT' to 'SUSPENDED'. Go ahead and try that now.
When you need to review or work in the previous year, that is 2024, then you will need to select option '03', and then option 'T' to toggle to the suspended payroll data. In order to proceed to the next step in the closeout procedure, you will need to be in the suspended year. Therefore, press the letter 'T' to Toggle to the suspended payroll year. Do that now!! Now exit from this option screen and return to the Payroll main menu. You will now see something new on the screen. That new item consist of the words, 'SUSPENDED DATA". You are now setup and ready to work in calendar year, 2024.
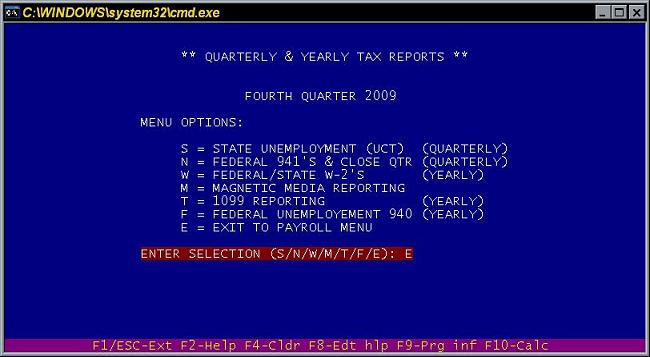
Figure 3
Now select option '42', Quarterly & Yearly Tax Reports. You will now see a screen that should look like the one in Figure 3 above. To begin the process you will complete the normal quarterly operations, and then proceed to the year-end procedures.
Step 1 - Select option 'S' and print out your State Unemployment Tax (SUTA) report. Since you are in the fourth quarter, you will input the number '12' when asked.
Step 2 - Now select option 'N' and print out the Federal 941 Tax (UCT-6) form. Again, since you are in the fourth quarter, input the number '12' when asked. Finally, there is no need to close the 4th quarter, since it is the end of the year. It also allows you an easy correction situation, where you can re-print the report if necessary.
Step 3 - DASI used to use a form-naming scheme where the year was part of the form filename. However we are now using the American Solutions Products form names for all W-2 forms. When asked for a form filename, press your [F7] key to browse the available forms, and select the appropriate form. Below is the form name we only support in the DOS version now:
| LW2A | 6-PART LASER W-2 - 2 to a page |
Step 4 - Now you can load your W-2 forms in your printer and select option 'W' for Federal/State W-2's. Since every printer is a little different, there is no way we can help you with the alignment situation. However, the W-2 program does have an alignment mask built-in, and we STRONGLY suggest that you use it.
NOTE. - WHEN PRINTING A MASK USING THE 6-PART FORMS, BE SURE THAT YOU PRINT IN GROUPS OF TWO. THAT IS, YOU CAN'T JUST PRINT ONE W-2, AND IF YOU GET LUCKY, START THE NORMAL PROCESS FOR YOUR EMPLOYEE INFORMATION. YOU MUST START THE RUN AT THE TOP OF THE FORM. THE 4-UP (LASER) FORMS PRINT ONE EMPLOYEE PER PAGE, THE OTHER FORMS PRINT TWO EMPLOYEES PER PAGE BUT REQUIRE MULTIPLE COPIES.
Magnetic Reporting
If you have a need to report all or part of your employee earning information by magnetic means, then this next section will cover the process to accomplish this task. By selecting option 'M' you will see the following screen with its options.
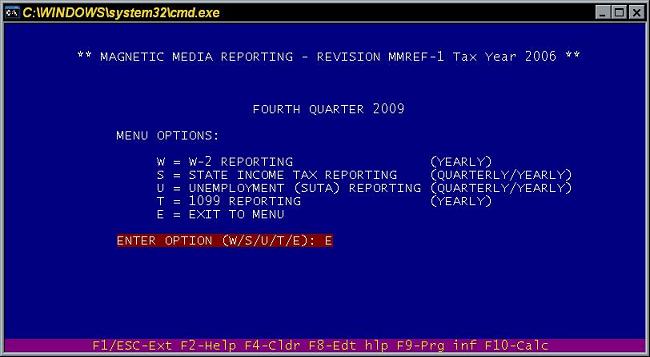
Figure 4
As you can see in Figure 4 above, you can print W-2's, State Income Tax, State Unemployment Tax, and 1099 information on diskette. For most of you, W-2 reporting is all that will be needed. By following the instructions on the screen, as well as, the manual furnished by the IRS regarding magnetic reporting, you will be able produce your W-2's or Finally - After all the steps have been completed, and you have printed all your forms, then you have two options.
1. You can either remove the suspended data, which does not affect the current data, or
2. You can retain the suspended payroll for one (1) full year (assuming you do NOT wish to suspend subsequent quarters), with the ability to review the information at any time.
If you decided to remove the suspended data, then you will again select option '03' from the Payroll Menu. You will see an option 'R', Remove Suspended Data. After selecting option 'R', you will be given one final opportunity to change your mind. NOTE: Removing the suspended data only removes the 2008 information. All information for 2024 will be intact.
Updating Tax Tables - Before you run the first payroll of 2025, you will probably need to adjust both Federal and State tax tables.
You have two options on this. One, you can manually enter the amounts from your Circular E (Publication 15) for $CurYear or you can let the program do that update for you. In order to let the program do it for you, you will need to be sure that you are current with the PA0005.ZIP file, so download and install the current version first. Then go to Payroll > File Setup/Initialization > Re-create Federal Tax Tables. The program will tell you beforehand which year's table it is about to create, so it should state $CurYear after downloading and installing the update, otherwise something went wrong with your update steps. Call Hamelin Tech Support in this instance. Answer "Y" (Yes) to re-create the FIT Withholding table. You can answer either yes or no to the next file, which is the EIC file and is obsolete. The only thing you will need to do after that is make your changes for the standard withholding allowances in the Federal Tax Table Maintenance program. This is accomplished by selecting option '13', Tax Tables off the payroll main menu.
As for the state tables, each state is different and again you will need to refer to your particular state tax table booklet to revise the information.
Most of the time the FICA ceiling and or percentage may increase from year to year. To modify these numbers, you will need to select option '01', File Setup/Initialization. After selecting option 01, choose option 'F' for the Firm File. Exactly six lines from the top line you will see the field regarding the OASDI ceiling. Change this number if necessary. Underneath are the FICA percentages for employee/employer. Now, press Page Down (PgDn) and press enter to change the ceiling or amount for the Medicare portion (HI).
Finally, don't forget to check your state unemployment percentage and change it if needed. That can be found under option 'I 3', Tax Tables.
Year-End General Ledger Procedures
At the end of each year, most of us have to go through this routine procedure called, 'Year End Close-Out'. Like Payroll, there are very specific rules and procedures that must be followed in order to successfully prepare your General Ledger for close-out and the beginning of a new year. First, whether you are calendar based, or fiscal year based, the process remains the same. Therefore, if your year does not until June, then save this issue of the Bits & Bytes and use it at that time. However, for most of us, the business year-end follows the calendar, just like payroll.
Make A Backup
The very first thing to do before we begin any updating or processing of information is to make a complete backup of the general ledger data files. If you do not have a specific procedure for just backing up general ledger, then make a complete data backup of all accounting information. We cannot stress how important this first step is. If anything should go wrong in this rather lengthy procedure, we need to be able to put "Humpty-Dumpty" back together again.
Suspend The Year
Now that you have made a backup of your general ledger data, the next step is to suspend the current year so that you will have adequate time in order input your adjustments, and produce an accurate and timely P & L and Balance Sheet.
To begin, proceed to the general ledger menu from the Integrated Packager Menu. The selection will be, '01'. At the general ledger menu, select option '03' for G/L File Utilities.
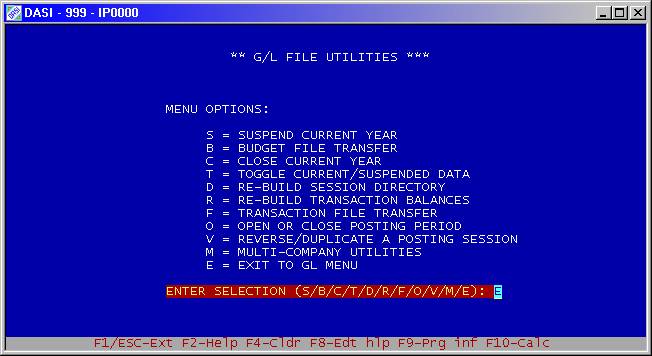
Figure 2A
As you can see in Figure 2A, the very first option, 'S' begins the process of suspending the current year.
If you DO NOT see an option 'S', then you already have a suspended year, and cannot suspend the current year until the suspended year is closed. In this instance, your 'C' option will state "CLOSE SUSPENDED YEAR". You MUST select this option FIRST in order to suspend the current year.
Select option 'S' to begin the process. You will now see a WARNING screen that outlines exactly what the program is going to do when it suspends the year. Take a few minutes and read this screen and then proceed to the next paragraph. Now that you have read the warning, proceed to answer the question with a 'Y' for Yes. The system will now check your system capacity to be sure you have ample room to copy the files. If you do not, then you will need to make some room in order to proceed. The suspend option will not work if ample space is not available.
Assuming that you have enough room, press the [Enter] to key to continue. You will now see the system copying files from one file name to another. Depending on how many transactions you have per accounting period, this could take anywhere from a few seconds to a few minutes. You will now be asked to press [Enter] to complete the final step. That step clears all the accumulators and clears the detail files to begin the New Year. Remember, since the system copied the files to begin with, all of your previous year information is intact.
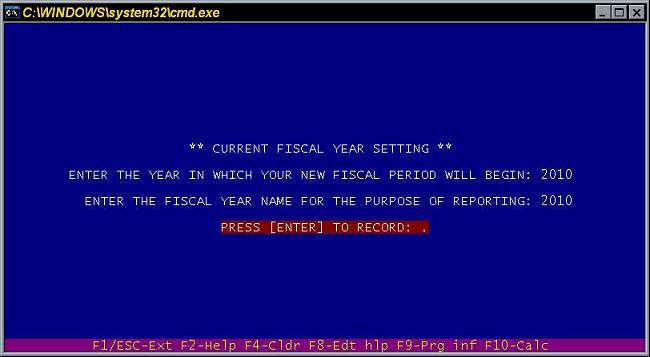
Figure 2B
When the process is complete, you will see a screen that looks like the one in Figure 2B above. Unless you need to change any information here regarding either your Fiscal Year or Fiscal Year Name, press [Enter] at this time. Now that you are back at the utilities menu, you will now see that you have a new item showing. That item tells you the current status of how general ledger is set at this time. As a default after suspending the year, the system will always be in the current year. When you exit from this menu, you will be returned to G/L Main Menu. Do that now, press 'E" to exit. Now you see at the bottom of the screen the words, '** CURRENT YEAR **".
This means that you are now in your NEW year, and that all of the previous year is being held in suspense until needed. Now that you have suspended the year, you can begin the New Year by simply entering normal entries into General Ledger, or any of the subsidiaries ledgers. When you need to make adjusting entries into the suspended year, you will need to toggle to that year.
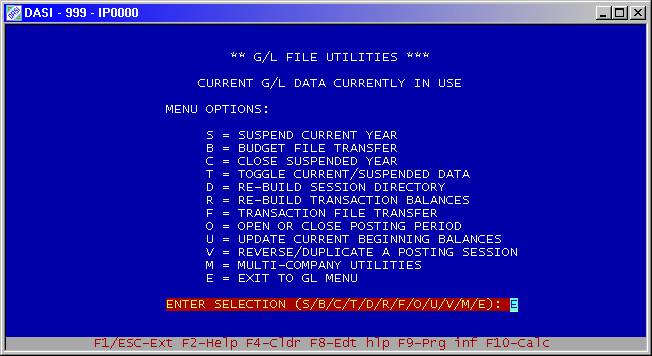
Figure 2C
As you can see in Figure 2C, by selecting option '03' you will return to the G/L File Utilities Menu. Unlike before you now see a new option titled, 'TOGGLE CURRENT/SUSPENDED DATA'. Go ahead a select option 'T' now.
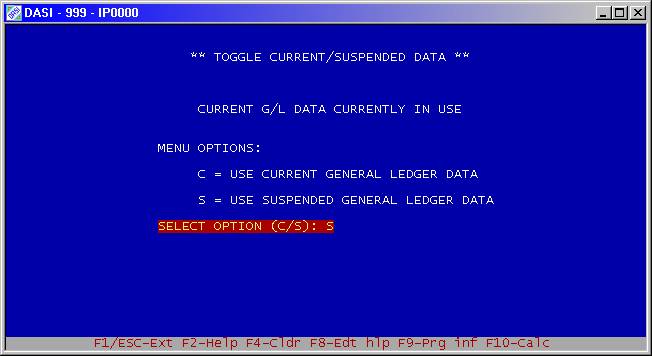
Figure 2D
As you see in Figure 2D, you can now choose option 'C' for current year, or option 'S' for suspended year. When you select either option, you will be returned to the previous menu. If you chose option 'S", the primary difference as far as the screens go is the status line will show SUSPENDED YEAR**" instead of current year. You can switch back and forth between years as often as needed. You should make all of your adjusting entries, printout all final year-end reports, and print a hard copy of the ledger. Remember, once the suspended year is closed, you CAN NOT go back and retrieve any prior year information.
Closing The Year
Note that THIS step is ONLY required if you choose NOT to SUSPEND the current year. If you have suspended the current year, STOP. Do NOT CLOSE the year, as the current year has ALREADY been closed during the Suspend Process.
To begin the closing of the year (either current or suspended), you may or may not have one last task to perform. If you want to be able to compare previous year and current year information, then you will need to perform the 'BUDGET FILE TRANSFER" option before closing the year. This takes the information from the accounting records and summarizes them for comparative purposes. To do this task, select option '03". At the G/L Utilities Menu, select option 'B'.
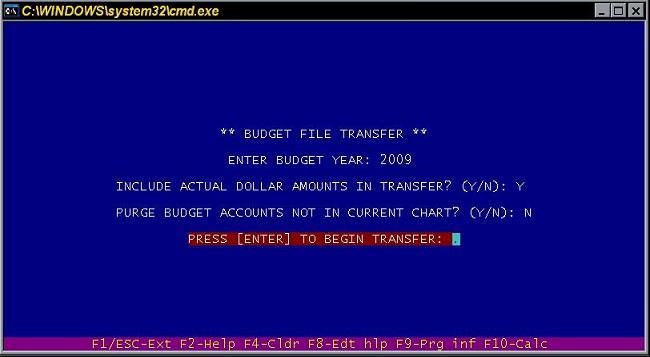
Figure 2E
First, be sure that you are in the “SUSPENDED YEAR" (if applicable) before you begin this process. As you can see in Figure 2E there are a couple of questions that need to be answered. The first is the year for the budget. G/L will default to the current year you are in. The next question wants to know if you want to transfer actual dollars. Answer 'Y" to this question. This option is available so that you can transfer a current year's NEW accounts to older year budget files WITHOUT actually transferring dollar amounts. If you are transferring to the current year budget file, answer 'Y' to transfer the dollar amounts, otherwise, always answer 'N' to transfer the chart of accounts list only to older years in order to keep those older budget files in sync with your current chart of accounts. Finally, answer 'N' to the purge option if you are transferring the current data to the same year budget file. It is safe to answer 'Y' to this question in any case, however. This option will DELETE any accounts in the budget file that DO NOT exist in your chart of accounts, but ONLY if those accounts in the budget file HAVE NO DOLLAR AMOUNTS.
If the file for 2024 does not exist, then the system will so inform you and ask if you want to create it? You should answer 'Y" for YES. If you answer 'N' for No, it will abort the transfer. After answering 'Y', G/L will transfer all of your suspended accounting data into the budget file so that you can use option "42", Budget Comparison Reports found on the G/L Main Menu. Now that this task is completed, you are ready to close the year. Again, at the G/L Utilities menu, you will select option 'C", CLOSE SUSPENDED YEAR. Do that now.
Again, you will receive a warning message explaining exactly what is about to take place, and reminding you to perform the budget file transfer before proceeding. Since we have already done that task, you can proceed by pressing the 'Y" for YES. You will now see a series of messages telling you that the system is updating the beginning balances. After that phase has completed, G/L will remove the old files from the system. Your suspended year is now closed.
Final notes: You can, after suspending the year, update the current year's beginning balances (Option 'U') from the G/L Utilities (Option 03) Menu. It does not matter whether you are in current or suspended year when you select this option, as the program always knows to read suspended data and update current data. This option is similar to the Close Suspended Year, as it updates the current year's beginning balances from the suspended year's ending balances, but DOES NOT close the suspended year. Use this option when you make adjusting entries to your suspended data, and you wish to have those balances roll forward to the current year without having to close the suspended year.
Accounts Receivable
.If you are using Accounts Receivable you may want to exercise the option to reset this years sales data information to save for reviewing for next year. This will also reset your year to date sales, and in some cases cost, so that you can track by customer what they are doing.
To accomplish this reset, go to the A/R main menu. Next select option 32, Month End Processing. Next select option 'Y' Year End Sales Update. This will move all current year sales/cost info into the previous years holding tables; This will also reset the current year to zero so that you can start tracking new sales for the current year.
Accounts Payable
In most cases you may need to print 1099's for your sub-contractors you do business with. After printing the 1099's, you should Zero out the totals to begin accumulating the totals for the new calendar year.
In both Job Cost/Accounts Payable and General Business Accounts Payable, option 34 takes care of this situation. Follow the instructions on the screen making sure you print your 1099's first before zeroing out the totals.
Last modified: May 1st, 2025.